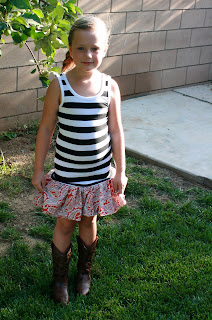
First of all lets just get out of the way how excited Peanut looks in these pictures... can't you just tell she was dying for me to take pictures of her (insert large dose of sarcasm)?? It's definitely safe to say she was completely over me and don't tell anyone but I might have had to resort to bribery... such as candy... desperate times call for desperate measures. ;)
Supplies you need:
1 tank top... (you could also use a t-shirt)
1/2 yard of fabric for outside of skirt
1/2 yard of fabric for lining inside
Coordinating thread
Step 1:
Measure your little peanuts waist and multiple by 2. Then measure to the desired length you want your dress to be and add four inches. *Keep in mind the skirt will likely be drop waist depending on your tank top so take that into consideration when measuring for length. Now cut 2 pieces of fabric with these dimensions... one for the front and the back of the dress.
Step 2:
Now we are going to cut out the lining for the skirt... Use your peanuts waist measurement but this time multiply 1.5 times. Then for the length use your desired length without adding the four inches we did in the step above. Cut two pieces again.
Step 3:
Grab your two pieces that will be the outside of the skirt... place these pieces right sides together and sew a straight stitch down both short sides. Now instead of have two pieces you should have sewn them together to create one. Repeat these steps with the lining fabric as well.
Step 4:
Pick up your fabric for the outside of your skirt again and sew a gathering stitch along the top and bottom of your fabric... if your are unsure how to do a gathering stitch ... place your straight stitch on the longest length it can go... mine says 4.5 on my sewing machine... and stitch how you would a normal straight stitch.... when you are finished gently pull either the top or bottom string while you push your fabric away from you and wa-lah you are gathering your fabric :).
Step 5:
Line your outside fabric and your lining fabric up... right sides facing each other (your lining will be inside your outside fabric when you have it lined up properly) ... gather your outside fabric until it is the same width around as the lining.... pin your fabrics together ... This will end up being the bottom of your skirt. Sew a straight stitch all the way around. Then turn right side out so the right sides are facing out and your seams should all be inside.
Step 6:
The top of the lining should be several inches shorter the top of the outside of the fabric... pull the lining up to meet with the top of the outside fabric this will create the bubble... the top of your fabric should already be gathered and the same width as the lining pin the tops together and run another gathering stitch through both fabrics.
Step 7:
Again gather your fabric by gently pulling the string and pushing fabric away from you until it matches about the width of the tank top. * (You probably will not have to gather this portion very much if your tank top can be stretched to the width you have without gathering you can skip the gathering part)... Because of the stretch in your tank top... only gather your skirt to the width of the tank top when you gently stretch it out (you want your skirt portion to fit over your peanuts body and unless you use a knit your fabric will not stretch like the tank top will... to fix this problem I stretch the tank top as I pin it to the skirt. So you can use the already finished hem of the tank top I turn the tank inside out... leave the skirt with the right side out but flip it upside down so the bottom of the skirt is facing up and the top of your skirt is lined up about a 1/2 inch from the waist line of the tank.... sew with a straight stitch and gently stretch the tank as you sew around.
Step 8:
Turn your dress right side out and then top stitch the finished hem of the tank down to the skirt so it lays nicely.
Yeah! You're done! Bust out your electric slide or your harlem shake ... pull out a little air chest bump ... and bask in all of your epically amazing fantasticness... admit it's a hard job to be this fabulous... but somebodies got to do it ;)
I'd love to hear from you... questions, comments, suggestions and topic ... leave it below. :)


Cute! I love the floral and the stripes together.
ReplyDeletei would like to see pics :) just like to see how to do it
ReplyDeleteI'm with you... I work better when I can see it also! :) I will try to revise this with some pictures in the next couple weeks. Thanks for stopping by!
DeleteCute dress! I love it with the boots!
ReplyDeleteNavy Wifey Peters @ Submarine Sunday Link Party