Monday, September 16, 2013

Tinkerbell Fairy Wings Tutorial Part 2


So here we are again back for more Tinkerbell... If you missed Part one of the Tinkerbell Costume Tutorial ... you can find it here .  In Part one we already made Tinkerbell's dress so now we are ready to tackle her wings.... and I'm not going to lie it took me a skinny second (insert sarcasm... more like a very large and extended second) to figure out exactly how I wanted to make these.  Number one issue of importance to me was that I wanted wings that would be attached to the dress and would not require any type of elastic straps on Lou's arms.  So I definitely achieved that but in hindsight... I would line the entire back of the bodice with some seriously heavy duty ultra firm stabilizer to lock those bad boys down and in place... but at this point my costume's done and I promise you I'm not going back :)

Supplies you will need:
1-2 yards of heavy duty fusible or non-fusible stabilizer (depending on how big you want your wings)
1 yard of solid white costume satin
1 yard of shimmery sheer fabric
two old metal hangers
thread 


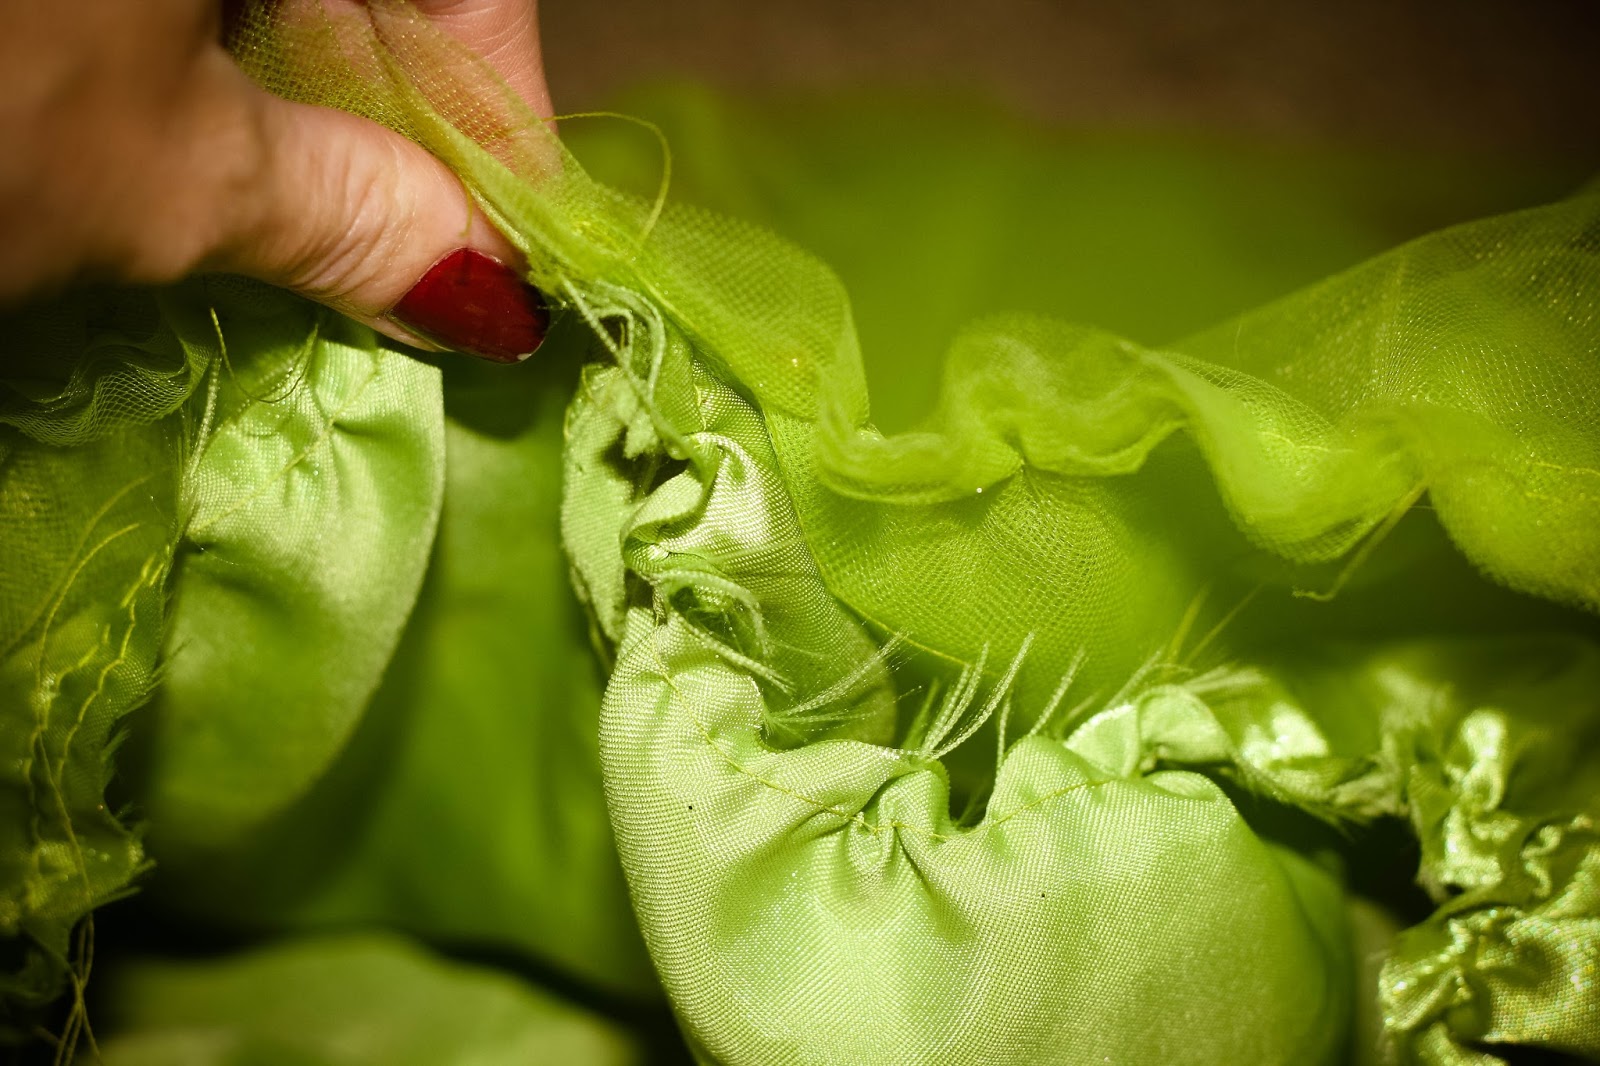
So you know from previous tutorials ... I definitely like to live on the wild side and experiment with sewing projects ... I never know in the beginning if the idea in my head will really work in reality ... but I like to think positive thoughts go a long way towards achieving success :) So we that in mind focus on how fabulous you are... and grab a marker ... or highlighter as you can see (or can't see ;) ) I grabbed... it was the only thing I could find the kids hoard any and all writing utensils.  Next grab your stabilizer and free hand a wing... if that feels intimidating just leave me a comment and I can send you my wing.  You can draw any wing you want... I made two different pieces per wing... the top (which is about twice the size of the bottom) and then the bottom.  Make sure to draw a tab several inches long on your wing (in the picture above its the portion of the pattern that my scissors are laying on) ... later on this will secure the wings to the dress.  Now go ahead and cut your pieces... you want 4 top pieces and 4 bottom pieces to make this sucker super stiff.  Sew two top pieces tog and two bottom pieces together for each wing leaving the tab portion open (do not sew the tab closed we need it open to be able to slide a metal hanger inside later in the tutorial)


As you can see I know have my wings cut out... now lay your wing pieces down on your fabric and trace around your stabilizer with a 1/2 - 1 inch margin for your seam.  You should have 4 pieces of the solid white fabric for the top of the wing and 4 for the bottom of the wing.  Do the same for the shimmery fabric.  Just in case you are lacking in basic math skills as I am I will do the hard adding for you ;) ... you should now have 8 total pieces of fabric for the top and 8 total for the bottom 


In this next step we are going to sew the wings together ... so you need to make a stack of fabric like this for all four wing pieces... 
1) stabilizer pieces on bottom
2) Solid white fabric facing right side up
3) Shimmery fabric facing right side up
4) Shimmery fabric facing right side down
5) Solid white fabric facing right side down


Pin your fabric onto the stabilizer with the fabric hanging over the edge 1/2 to 1 inch on all sides.  You want to line your needle up so that you are sewing closely around the edge of the stabilizer but do not sew on the stabilizer.  Sew all the way around leaving the several inches of the tab free so that we can turn the fabric inside out once we are done.


Now that you are done sewing all four wing pieces... turn your fabric inside out and push your stabilizer portion inside as well... it will be a snug fit.  


Next take two metal hangers, unfold the hook portion and mold the hanger until it is the the right size to slide inside the top portion of your wing but still keeps the tab free.


After your hanger is secured...line up a bottom wing with a top wings tab so that the bottom tab is on top of the top tab... sew a straight stitch over both tabs to secure the two wing pieces together.  Next cut two squares of stabilizer that are 1-2 in longer in length then the the tab of the top wing, and then 4-6 inches in width.  Cover both of these squares with shimmery fabric you could also use your green fabric to cover these instead which I wish I would have done... (two pieces right sides facing ... sew along the edge leaving a few inches open on one side... turn right side out and slide your stabilizer square inside... then sew the open side closed.


Grab one of your shimmery squares and cut two long slits equal to the tab on your wing... leave the other square un cut.


Push your wings tab through each slit.  Now sew a straight stitch down the right of the slit (right next to the wing) to secure the bottom wing tab going to the right underneath the square... flip the wing over and sew directly to the left of the slit and wing to secure the top wing tab to the left underneath the square.  Do that exact thing to the other wing as well.


Put your uncut square inside the back bodice (in hindsight this is why I would have lined the whole bodice when making the dress with stabilizer to eliminate this step)


On the outside of the costume in the middle of the dress back, line up the wings with the stabilizer square in the inside of the dress so we have lots of support for the wings and wont risk tearing the dress.  Pin these pieces together.


Because this is a lot of stabilizer and fabric to sew through to keep my sewing machine from getting jammed ... I had to manually hand turn my needle while pushing the fabric through.  Sew a straight stitch straight down the middle and then two more straight stitches down each side of the stabilizer squares.  PARTY TIME!  Tinkerbell wings complete!!


Only one step left... Tinkerbell's shoes!  Check back later for part three!  Thanks so much for stopping by!  Let me know if you have any questions or need any help :)

Photobucket

Wednesday, August 28, 2013

Part One Tinkerbell Costume Tutorial


In October we are planning on a Disneyland visit for all of the Halloween festivities and what better way to prepare then to make a Tinkerbell costume for our little Lou.  Ironically I'm going to be the larger version of Tinkerbell... so we can be matching... now I'll give you I may not be quite as cute as Lou but I'm still going to "bring it" Tinkerbell style.  So this is just part one ... I'm still brainstorming on her wings and shoes... so you'll have to check back for all that fabulousness.  :)  Just a quick note... for the dress bodice I used  the Viola Violette Field Threads Pattern .  However... in the tutorial I will explain how to do a quick bodice without a pattern also if you don't want to buy a pattern. If you have never used  this pattern before... it's amazing... I can make about a thousand different dresses from this pattern... by the way Violette Field threads does not in any way reward me for these thoughts :) as far as I know I'm sure they don't even know how much I adore this pattern or that I even exist... so you can take that to mean this pattern is truly life changing ;)

What you need:
2 Yards of your satin costume green 
5 yards of green tulle 
green thread
and a very wonky hand drawn leaf frond


If you are having problems with a leaf frond (i think that should be the word of the day... frond) let me know and I can upload my very unprofessional frond to be printed.  If you are crazy brave and like to live on the wild side... measure from just above your littles belly button to your desired length on their leg and add about an inch for seam allowance.  I cut out 10 of these pieces so when there are put tog I had 5 leaves total.  Set these aside after you have cut them all out and grab your tulle.  I used 5 yards but you could definitely use less or more depending on how poofy you want Tinkerbell to be.  I think the easiest way to measure your tulle is keep it the way it was on the bolt or how the fabric lady cut it... so it should already be folded in half... from here add 3 inches onto you leaf frond measurement ... that will be your length and your width will just be however wide your tulle already is as it's folded in half... keep moving down your tulle until you have measured and cut all the way down your five yards...
at this point unfold all of your pieces and align them on top of each other like the picture below... 


Then I took that pile and folded the edges together in half like the picture below... pinned the edges and sew a straight seam down the side.  Next sew a long (4.5 if you have a digital sewing mating) straight stitch along the top of the fabric (should be a tube now that you have sewn down the side) to gather the top (to gather just pull one of the strings and push the fabric along it to gather the fabric).  If you want a liner underneath your tulle... my girl is super picky about itchy tulle... So I just cut two rectangles slightly shorter than my tulle with the green costume satin used for the leaves and folded in half ... sewed a straight stitch up the side and gathered the top just like the tulle... set both of these aside for a sec...


Bodice:  
If you have the viola pattern follow that exactly for the top half of the dress (front and back bodice, halter straps, and lengths of fabric for bow in back) 
If not an easy bodice that will slip over her head... take her chest measurement add 2 inches... divide in half ... cut 4 pieces in these dimensions... grab some ribbon for straps and bow in back cut appropriate length for your little peanut ... take first two pieces of fabric place ribbon two to three inches out from center of fabric on top of right side facing fabric... place another piece of fabric right side down and pin together along the top so your ribbon is secure and both pieces are evenly lined up.  Sew a straight stitch just along the top.... turn pieces right side out iron and press and that do a topstitch across the top to secure everything... do the same thing to your other two pieces of fabric obviously omitting the ribbon since this will be a halter top.  At this point if you want a bow in the back cut two more pieces of ribbon long enough to be tied in a bow in the back... place bodice front right side up and place ribbon on both left and right sides facing into center... place back bodice right side down.... line everything up (side seams and ribbon in between)... pin down sides and and sew a straight stitch down both sides... your bodice should now be finished.  


Now for the construction of the bottom half of the dress... sew your leaf fronds together with right sides facing each other... once sewn together turn right side out... now I don't know if you have this problem ... but costume satin and I have a love hate relationship ... love because she's cheap... hate because she's a real Bee-otch to work with... so that you don't throw your beloved sewing machine across the room at this point I found that if I topstitched around the outside of the leaf starting in the center like below... it kept the material from getting all wonky.  Did I say topstitch around all five leaf fronds? I'm getting distracted  :) ... make sure you do the topstitching ... I think it makes the fabric lay so much better. 


Friends ... you are getting so close!!  Bodice and leaf fronds done!  Now just the skirt!  So line up your tulle and liner (if you made one) make sure you have pulled the gathers tight enough so they line up with the width of the bodice.


Here's the tricky part .. if you get stumped put your helmet on ... bang your head against the wall a few times... slam a diet coke ... and reassess the situation... you have no idea how many seams I ripped out while experimenting with this dress :) but just keep in mind anything can be fixed... so on that note... with your tulle and liner together right sides out... slide your bodice right side down and upside down over the top of the skirt so that the top of skirt and the bottom of the bodice line up like below... I first pinned this together and then went back through with my leaves and slid them on top of skirt and below bodice so they are in between and lined up at top of skirt...


Pin the leaves spaced evenly and overlapping some depending on the size of your dress... once everything is pinned together sew along the top edge a straight stitch to secure all pieces.  Flip your bodice up and topstitch on the outside of the bodice along the edge where it meets the skirt... you are D- O- N- E!!!  Work it girl (or dude) ... your awesome and your little peanut is going to be totally adorbs!!


So definitely check back for shoes and wings coming soon!  Thanks for stopping by and feel free to leave questions and comments! :)


Photobucket

Saturday, August 17, 2013

The Story Behind The Pictures....

It started out as a normal Saturday... finish latest sewing project... bribe youngest daughter to let me take ridonculously gorgeous pictures of her... get a Mcdonald's Diet Coke in a foam cup... cart 14 children (slight exaggeration... 4 to be exact... but you know... 4 rounded up to 14... pretty much the same thing) around to run a few errands and take them to the duck pond to see their favorite duck friend, lovingly named "Afro Duck" (obviously for his fro... who knew ducks had afros... if you are dying of curiosity right now ... look it up ... white crested duck... I'm sure all of you have reached a higher level of genius than I have... and already knew about the white crested duck and his glorious fro... but I promise you when I first laid eyes on "Afro Duck" it was a magical moment for me)  and finish with a few goodies from the chocolate shop. 
It was at the duck pond where our day took a turn... some may say a turn for the worse... however I say a turn for the better... it's not everyday I have the cops called on my children and I while feeding ducks at the duck pond. Who knew you could even do anything at the duck pond that would prompt a 911 call and visit from Mr. Officer.  Let this be a lesson to you... there is apparently a duck patrol on the loose... and they speak for "Afro Duck" and "Afro Duck's" friends... they are the voice for the voiceless.  So anyways back to Mr. Officer (I wish I knew his name... but as any good citizen... I referred to him as officer when speaking to him :) ) 

 I was in the middle of taking these pictures of Lou, when out of the corner of my eye I see an Officer of the Law talking to my son and neighbor kid we brought with us.  I quickly walk over to them and say, "Is their a problem Officer?" Looking back now it was probably laying it on a bit thick to refer to him as officer, but it just popped out!  Mr. Officer replies, "There's been a report made that you were picking up the ducks and throwing them." To which I said, "Well that would be traumatizing."  I can't imagine what my face must have looked like, because there was a long pause and then Mr. Officer awkwardly adds, "Yah, I've never tried to catch a duck and I'm not even sure how you would go about doing that." Me.. "Hmmm... yah that would be tricky." Mr. Officer..."They also reported you were throwing rocks at the ducks..."  Me..."Ummm... we had a loaf of bread we were throwing..."  Long pause again... Officer..."They also said you were running at and chasing the ducks."


At this point I'd like to question... "Is there a law against running towards the ducks?  If so maybe the Certified duck patrol should put out a rule sign... not that I would read the rule sign... but I can see how this would cut down on confusion for other duck pond goers... like say can you run parallel to the ducks... can you run towards the ducks as long as you maintain a 2 foot distance at all times ... or can you chase the ducks as long as they are only in groups of 4.... people lets get specific here who knows if I was running at the ducks or maybe I got something in my eye and was temporarily blinded while running and didn't know I was going toward the ducks... anyways... I say to Mr. Officer..."Listen, I'm not going to lie, my kids were running around near the ducks... but I promise you in no way were we harming ducks."  Long Long Long Pause.... awkward pause... still getting more awkward pause... Me..."Welp, Ok, Sorry about that... kids lets go!"  Mr. Officer... "Just make sure you don't harm the ducks."   Thoughts to self... keep a straight face... don't get arrested for attempted duck violence... do not ask Mr. Officer why we can't run at the ducks.... do not let son who has a big mouth ask Mr. Officer why we can't run at the ducks... Do not ask Mr. Officer if I look like someone who would pick up ducks and throw them... Smile and wave at all the people at the duck pond, so the secret duck patrol knows you're not getting arrested for duck throwing...get out of most awkward situation with Mr. Officer as quickly as possible...


So as you can see pictures can be deceiving... no one would know from these adorable pictures that I almost got arrested for duck death by throwing... 

Thanks for stopping by and sharing in another day in this crazy girl's life! 

This dress is now available in my Etsy store and the poppy lavender head wreath will be available in the next couple days.


Photobucket

Saturday, July 27, 2013

DIY Hand Stamped Mustache Pants


 Recently I found a super cute tutorial on pinterest for hand stamped leggings.  You can check it out on How Does She , a tutorial by Lara.


She used cat stamps that were adorable, but I thought my Lou would love mustaches instead.  So following Lara's instructions we created our own mustache stamp out of sticky back foam pieces.


 Instead of dipping the stamp in fabric paint, Lou painted the stamp with a paint brush and I stamped them on the paints.


We about had a throw down over who was actually going to stamp the pants, but luckily I won! It was a super quick project and only took an evening with drying time and all.
Photobucket

Tuesday, June 25, 2013

Bubble Dress Tutorial

Shocking...this is not another maxi dress tutorial.  I've moved on (for the moment) to bubble dresses.   But get excited ... you can totally do this in an hour or under!!!  As always I've been pushing forward on my quest to use up the fabric I have in my hoarder's pile and this is the latest treasure to come out of that epically cluttered pile.  I have to admit though I did buy the tank top but in my defense it was super cheap at Target... so I still made this project for under $10... that counts for something... right? :)  Unfortunately I do not have pictures of the actual sewing process so I will just be doing a step by step description.  If enough people are interested in making this dress and prefer to have pictures with the tutorial I will definitely consider making another dress just so I can picture take during ... so let me know if that would be helpful to you. :)

First of all lets just get out of the way how excited Peanut looks in these pictures... can't you just tell she was dying for me to take pictures of her (insert large dose of sarcasm)??  It's definitely safe to say she was completely over me and don't tell anyone but I might have had to resort to bribery... such as candy... desperate times call for desperate measures. ;)  


Supplies you need:

1 tank top... (you could also use a t-shirt)
1/2 yard of fabric for outside of skirt
1/2 yard of fabric for lining inside 
Coordinating thread


Step 1:

Measure your little peanuts waist and multiple by 2.  Then measure to the desired length you want your dress to be and add four inches.  *Keep in mind the skirt will likely be drop waist depending on your tank top so take that into consideration when measuring for length.  Now cut 2 pieces of fabric with these dimensions... one for the front and the back of the dress.  

Step 2:

Now we are going to cut out the lining for the skirt... Use your peanuts waist measurement but this time multiply 1.5 times.  Then for the length use your desired length without adding the four inches we did in the step above.  Cut two pieces again.

Step 3: 

Grab your two pieces that will be the outside of the skirt... place these pieces right sides together and sew a straight stitch down both short sides.  Now instead of have two pieces you should have sewn them together to create one.  Repeat these steps with the lining fabric as well.

Step 4:

Pick up your fabric for the outside of your skirt again and sew a gathering stitch along the top and bottom of your fabric... if your are unsure how to do a gathering stitch ... place your straight stitch on the longest length it can go... mine says 4.5 on my sewing machine... and stitch how you would a normal straight stitch.... when you are finished gently pull either the top or bottom string while you push your fabric away from you and wa-lah you are gathering your fabric :).  

Step 5:

Line your outside fabric and your lining fabric up... right sides facing each other (your lining will be inside your outside fabric when you have it lined up properly) ... gather your outside fabric until it is the same width around as the lining.... pin your fabrics together ... This will end up being the bottom of your skirt.  Sew a straight stitch all the way around.  Then turn right side out so the right sides are facing out and your seams should all be inside.

Step 6:

The top of the lining should be several inches shorter the top of the outside of the fabric... pull the lining up to meet with the top of the outside fabric this will create the bubble...  the top of your fabric should already be gathered and the same width as the lining pin the tops together and run another gathering stitch through both fabrics.

Step 7:

Again gather your fabric by gently pulling the string and pushing fabric away from you until it matches about the width of the tank top.  * (You probably will not have to gather this portion very much if your tank top can be stretched to the width you have without gathering you can skip the gathering part)... Because of the stretch in your tank top... only gather your skirt to the width of the tank top when you gently stretch it out (you want your skirt portion to fit over your peanuts body and unless you use a knit your fabric will not stretch like the tank top will... to fix this problem I stretch the tank top as I pin it to the skirt.  So you can use the already finished hem of the tank top I turn the tank inside out... leave the skirt with the right side out but flip it upside down so the bottom of the skirt is facing up and the top of your skirt is lined up about a 1/2 inch from the waist line of the tank.... sew with a straight stitch and gently stretch the tank as you sew around.

Step 8:

Turn your dress right side out and then top stitch the finished hem of the tank down to the skirt so it lays nicely.

Yeah!  You're done!  Bust out your electric slide or your harlem shake ... pull out a little air chest bump ... and bask in all of your epically amazing fantasticness... admit it's a hard job to be this fabulous... but somebodies got to do it ;)

I'd love to hear from you... questions, comments, suggestions and topic ... leave it below.  :)


Photobucket

Monday, June 24, 2013

Clothing Tags and Labels

I've been on a clothing label and tag quest... you know... one that takes little to no effort... is cheap... and that I happen to have supplies for in my hoarder pile that has been discussed in detail... herehere and here.  That's the thing about hoarder's piles you find unexpected treasures, such as this bias tape.
  

Just as a small disclaimer... if you don't have a letter stitching function on your sewing machine this post is not going to be very magical for you... if you do have this function... it is your lucky day!!  To begin with... I cut about a 5 inch strip of the bias tape to ensure I had plenty of room for my company name.  


If you have a Husqvarna sewing machine and are unsure how to use your letter stitching function... I would be happy to give you helpful tips if you need some... Otherwise your on your own friends I haven't tried this on any other machine.  If your anything like me your instruction booklet should literally be labeled !&%$... it's a four letter word if you know what I mean... don't tell anyone I'm saying this but there's a teensy chance it could come in handy in this instance ;)


Once you have programmed a letter sequence into your sewing machine ... stitch away! After you finish, iron each end under and then place on article of clothing and stitch around all sides.  And Ba-Bam... you have a super cute clothing label.  Unfortunately I was experimenting with different colors and you can't see my clothing label very well on the skirt below ... but trust me it's adorable!  


Just to keep things simple I also used the same method to make a clothing tag.  I used some peacock feather embossed card stock I had on hand... did a little fancy schmancy cutting with my little girls scissors ... mainly because whenever I need my regular scissors they magically disappear... it's like socks when you wash them... somewhere between the washer and the dryer... POOF ... they disappear.


  Next just sew your label directly onto your card stock with a straight stitch with coordinating thread.


Add a little twine for some serious cute factor....


And Ta-dah... It gives your item just that added touch it needed (well at least mine needed it :) ).


Feel free to leave comments or thoughts below!  Thanks for stopping by :)


Photobucket